COMPLETING THE INDIVIDUAL TRAINING NEEDS ASSESSMENT (ITNA) & DEVELOPMENT PLAN IN CAPS LMS
<![if !vml]>
<![endif]>
Steps for the Individual Being Assessed
There are TWO distinct processes all PCSA
caseworkers and PCSA supervisors are required to complete in CAPS LMS to comply
with OAC Rule: 1) Completion of their assigned ITNA in conjunction with their supervisor,
and 2) Creation of an individual development plan (IDP) with their
supervisor�s input and approval. Instructions to complete both are included
in this guide.
Individual Training Needs Assessments (ITNAs) � known as
competency assessment tasks in CAPS LMS — are assigned every two years by
the Ohio Department of Children and Youth (DCY) in CAPS LMS. You complete your
assigned ITNA from your own perspective and your supervisor receives an
assignment to provide their perspective on your learning needs. Once both perspectives are collected, you and your supervisor
review and discuss the ITNA results and decide which recommended development
actions are appropriate for you. You add those recommendations to the
development plan to be created.
Once created, you add objectives to the plan for any key
practice areas you identified as needs in the
ITNA, adjust plan timeframes as needed, and submit the plan for your supervisor�s review and approval.
The development plan guides your learning and is automatically updated as you
complete learning interventions in CAPS LMS.
<![if !supportLists]>1. <![endif]>�Completing the Individual Training
Needs Assessment (ITNA)
<![if !supportLists]>2. <![endif]>Reviewing Results with Your Supervisor
<![if !supportLists]>3. <![endif]>Creating Your Resulting Development Plan
<![if !supportLists]>4. <![endif]>Adding Key Practice Area Objectives and Finalizing Your Development Plan for Supervisor Approval
<![if !supportLists]>5. <![endif]>Working with Your Active
Development Plan(s)
<![if !supportLists]>1. <![endif]>COMPLETING THE INDIVIDUAL TRAINING
NEEDS ASSESSMENT (ITNA)
<![if !vml]> <![endif]>To
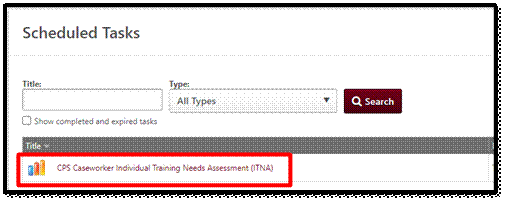
locate your assigned ITNA, select
Scheduled Tasks from the Profile menu tab OR select the View
Tasks tile on your Welcome Page:
Select the title of your assigned
ITNA:
<![if !vml]>
 |
<![endif]>
NOTE: If you do not see an assigned
ITNA on the screen pictured
above and you are a PCSA caseworker or supervisor, contact capslms@childrenandyouth.ohio.gov.
Review the task instructions and select Continue:
<![if !vml]>
 |
<![endif]>
Select Begin to
the far right of your ITNA:
<![if !vml]> <![endif]>Review the Rating Scale you
will use throughout the assessment (shown
at the top of the assessment):
<![if !vml]>
 |
<![endif]>
Review and rate each of the behavioral indicators listed under the ten competencies:
<![if !vml]>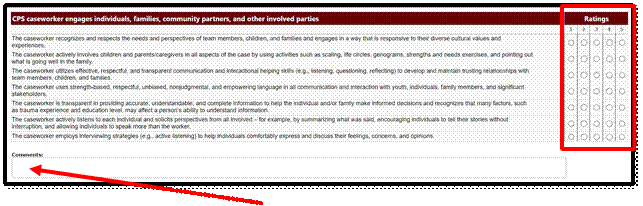 <![endif]>[OPTIONAL] Add context to your ratings
by entering notes in the Comments
box beneath each competency. NOTE: Comments are
visible to both you and your supervisor.
<![if !vml]>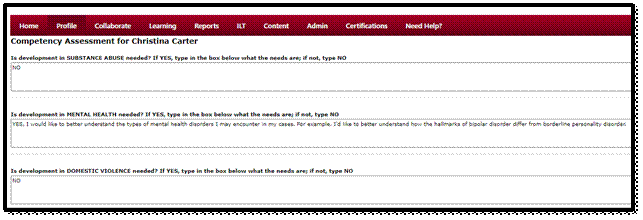 <![endif]>If needed,
you can select Save & Return at the bottom to finish completing the assessment at another time. Otherwise, when finished
rating all items, select Continue to
proceed to the list of key-practice area questions:
<![if !vml]>
 |
<![endif]>
The final part
of the ITNA is a series of required questions to determine development needs in
key practice areas. If the practice
area is not a development need, type NO. If it is a development need, type YES along with a brief
description of your development needs in that practice area:
<![if !vml]>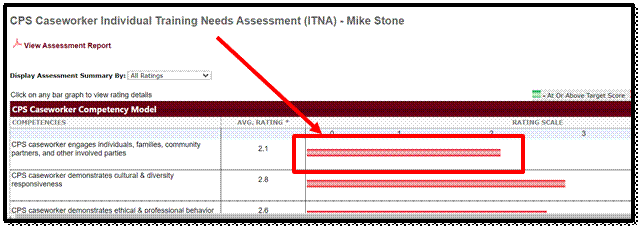 <![endif]>When you have answered
all key-practice-area questions, select Submit Assessment to
see your results:
<![if !vml]>
 |
<![endif]>
Select the first rating
bar graph on the assessment results screen:
<![if !vml]>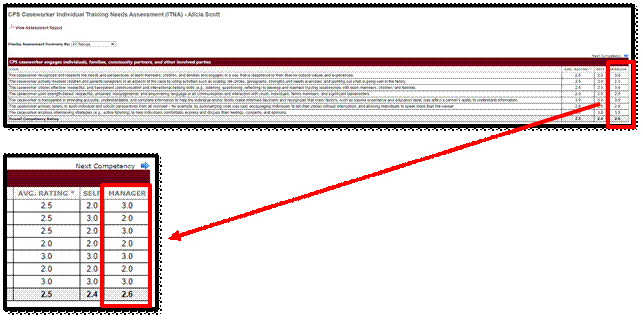 <![endif]>If you do not see a manager�s rating
column (see example
below), STOP. Your supervisor has not yet completed their side of your
assessment:
Alert your
supervisor that you have completed your side of the assessment and are waiting
on their input to proceed. You will
receive an emailed notification when both sides of the assessment are complete. You can also check back periodically to see if the manager�s
rating column has been added (by
selecting the first bar graph on the results screen). When your supervisor has
completed their part, proceed to the next section.
<![if !supportLists]>2. <![endif]>REVIEWING RESULTS WITH YOUR SUPERVISOR�����������������������������������������
If not already on your competency assessment results screen,
select Competency Assessment Summary
<![if !vml]> <![endif]>from your Learning
menu tab and select the View icon to
the far right of your assessment name:
<![if !vml]> <![endif]>Select View Assessment Report at the top of your competency assessment results screen:
Save the report when prompted, then open and review
it with your supervisor. NOTE: Your supervisor has the same ability to view
your report by following the steps in their own instructions.
Your discussion may include your strengths and weaknesses, areas where you disagreed on ratings,
review of contextual comments, etc.
Make note of any key practice
areas that you agreed are development needs.
You will add objectives
for these to your development plan in Step 4.
If you decide that an adjustment is needed to an overall
rating, the adjustment is made by the
supervisor (included in their instructions).
When finished discussing the results, you are ready to create your resulting development plan
collaboratively with your supervisor.
<![if !supportLists]>3. <![endif]>CREATING YOUR DEVELOPMENT PLAN�������������������������������������������������������
<![if !vml]> <![endif]>Creation of your development plan begins from your competency assessment results screen,
accessed by selecting Competency
Assessment Summary from your Learning
menu tab and then selecting the View
icon to the right of your plan name:
At the top of the resulting
screen, change the Display
Assessment Summary By dropdown to
<![if !vml]>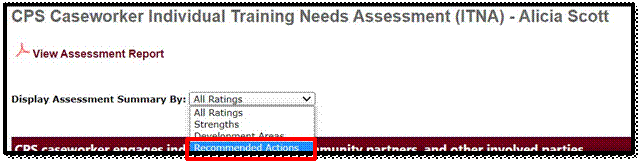 <![endif]>Recommended Actions:
Recommended
development actions (instructor-led training, self-directed courses, materials,
videos, coaching) are listed
under each competency, based on your assessment ratings.
For example, you will
see the coaching request form appear as an option if a competency was rated a 4 or 5. Review each competency�s recommended
development actions (preferably with your supervisor). Click on a recommended
action�s title to see more information about it in a new browser tab.
<![if !vml]> <![endif]>Select those actions that you�d like to add to your development plan, using the checkboxes to the left of
each. (Note: while the supervisor can see recommendations, only the worker can select them.) Be sure to select at least one item
under each competency:
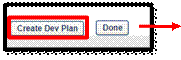
After you have reviewed
all recommendations and made your selections, scroll
to the bottom and select
Create Dev Plan:
<![if !vml]>
 | |||
 | |||
<![endif]>
On the next screen you will see green checkmarks to the left of
all recommended development actions added to your development plan. If no additions are needed, proceed
to step 4 in these instructions. If you wish to add more items to your
development plan, continue checking boxes to the left of recommendations and
then reselect Create Dev Plan at the
bottom. Otherwise, select Done and
proceed to step 4.
You can re-use these instructions at any time to add more recommendations from your assessment results to your development
plan.
<![if !supportLists]>4. <![endif]>ADDING
KEY PRACTICE AREA OBJECTIVES AND FINALIZING YOUR DEVELOPMENT PLAN FOR SUPERVISOR APPROVAL
<![if !vml]> <![endif]>Select
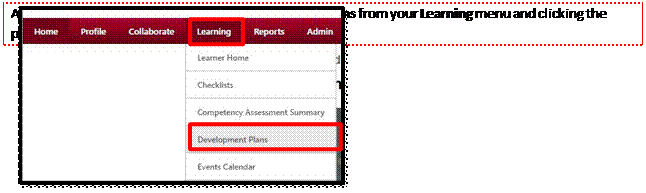
Development Plans from the Learning menu tab. Select
Edit from the dropdown
to the right of your plan name:
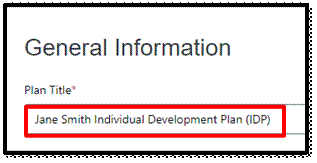
RENAME YOUR PLAN
Rename your Plan Title as follows: [Your Name] Individual Development Plan (IDP):
<![if !vml]>
 |
<![endif]>
ADD KEY PRACTICE AREA OBJECTIVES
Before
reviewing and adjusting the objectives and learning objects already in your plan, you�ll first add
objectives to represent any key practice areas you identified as development
needs in the series of YES/NO questions on the final screen of your ITNA. These were noted in your PDF Assessment Results Report you downloaded in Step 2.
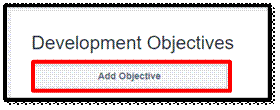
To add a key-practice-are objective, select Add Objective immediately beneath the Development Objectives heading:
<![if !vml]>
 |
<![endif]>
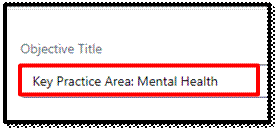
Add
an Objective Title to
match the identified key practice area:
<![if !vml]>
 |
<![endif]>
Select Search for Learning to
search for learning
activities to add to the objective:
<![if !vml]>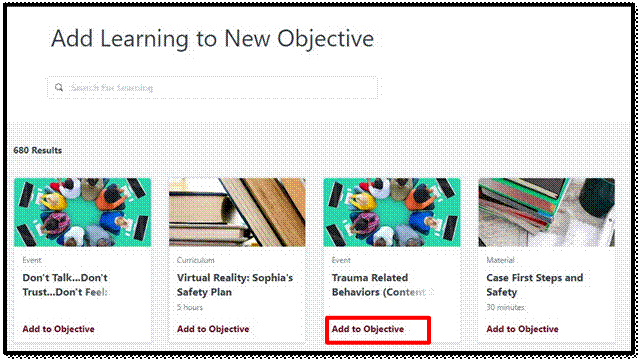 <![endif]><![if !vml]>
 <![endif]>
Use the left-side SUBJECT search criteria to find learning activities in your key practice area:
<![if !vml]>
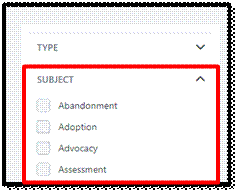 |
<![endif]>
To add learning objects
from search results
to your plan, select Add to Objective at
the bottom of the
learning object tile:
<![if !vml]> <![endif]>When finished
searching for or adding new actions, select Return to Objective at the bottom
of your search results screen:
Adjust the Due Dates of the learning activities
you added to match your two-year ITNA cycle end date. The system defaults to
extending them only a single year. Making this adjustment ensures you will
receive timely reminders when your plan is due to expire, as your plan�s end date becomes the farthest
due date on any objective or action within the plan:
<![if !vml]>
 |
<![endif]>
When finished adding
learning activities and adjusting their due dates,
select Save and Return to Plan at the bottom of the screen:
<![if !vml]> <![endif]>When finished adding objectives for key practice
areas, follow the instructions below
to review and adjust your plan�s other objectives.
ADJUST OTHER OBJECTIVE DUE DATES
It�s important
to adjust due dates in all objectives in your plan. You may also want to add or remove learning activities from your other
plan objectives.
You will see
already-created objectives in your plan for each competency area you noted as a
development need in your ITNA (blue boxes below). The development actions you selected when reviewing your ITNA results
will appear as learning activities under each of those competency-based objectives (red boxes
below):
<![if !vml]>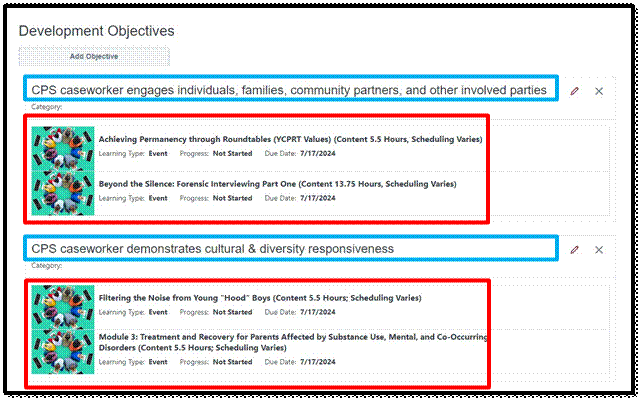 <![endif]><![if !vml]>
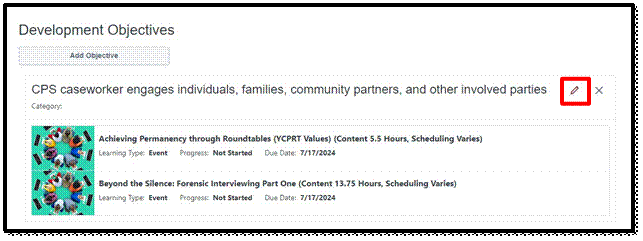 <![endif]>Select the Pencil icon to the right of each objective:
Adjust the Due Dates
of your individual learning
activities to match your two-year ITNA cycle
end date. The system defaults to extending them only a single year.
Making this adjustment ensures you will receive timely reminders when your plan is due to expire,
as your plan�s end date becomes the farthest
due date on any objective or action within the plan.
<![if !vml]>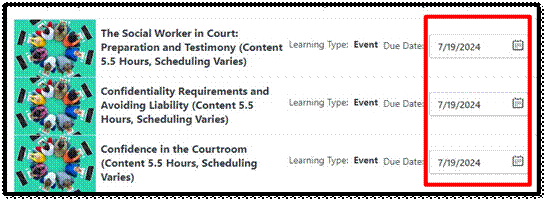 <![endif]>
<![if !vml]>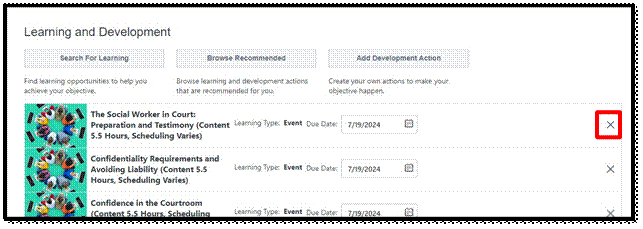 <![endif]>Remove development actions you no longer plan to pursue by clicking
the X to the right of that object:
<![if !vml]> <![endif]>Use the Search for Learning
button to search for and add new learning objects
to an objective:
<![if !vml]>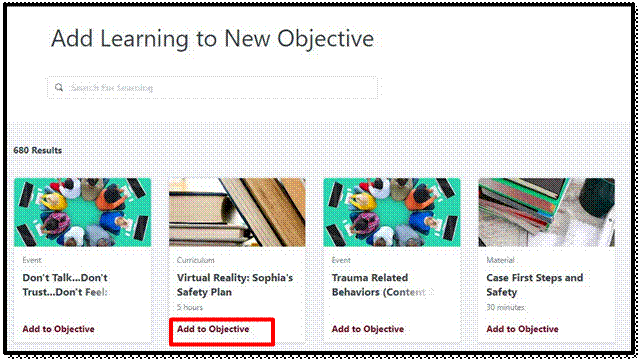 <![endif]>To add learning objects
from search results
to your plan, select Add to Objective at
the bottom of the
learning object tile:
<![if !vml]> <![endif]>When finished
searching for or adding new actions, select Return to Objective at the bottom
of your search results screen:
<![if !vml]> <![endif]>When finished
adjusting learning objects
and dates within
an objective, select Save and Return
to Plan:
<![if !vml]> <![endif]>When you are finished
adjusting your overall
plan, select Submit Plan. This will alert your supervisor the plan is ready for their review and
approval:
<![if !supportLists]>5. <![endif]>WORKING
WITH ACTIVE DEVELOPMENT PLAN(S)����������������������������
Once a plan is
approved, it becomes your guide for learning and development over the remainder
of your two-year ITNA cycle. Not only does your plan link you to learning
interventions designed to meet
your specific development needs, it allows you to�
<![if !supportLists]>�
<![endif]>Create plan-related threaded
conversations with your manager,
<![if !supportLists]>�
<![endif]>Upload supporting documents (e.g., competency assessment results report, coaching documentation, peer-shadowing
notes, etc.),
<![if !supportLists]>�
<![endif]>Monitor your plan-completion progress,
<![if !supportLists]>�
<![endif]>Review your plan�s
modification and approval
history.
<![if !vml]>
 |
<![endif]>
Once in your plan, click on a learning action to see more details
about it, and to enroll in
(instructor-led) or launch it (self-directed). Lea will open in separate
browser tabs. Simply
close the new tab to return to the development plan view.
As you complete learning
actions identified in your plan, their status in the plan changes
from �Not Started� to
�Enrolled,� �In-Progress,� �Completed,� etc. The objective�s
and the overall plan�s completion percentages are automatically updated as
learning actions are completed.
<![if !vml]>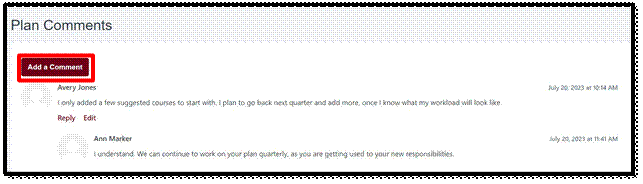 <![endif]>Your plan includes built-in
discussion capability. Under Plan Comments, select Add a Comment
to create a threaded discussion between you and your supervisor:
<![if !vml]>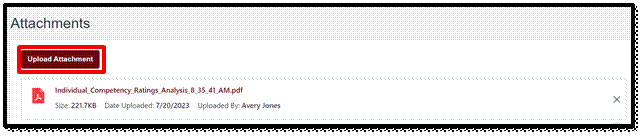 <![endif]>You also have the ability
to add supporting documents to your plan. Under Attachments, select Upload Attachment to add files like
your competency assessment results report, coaching, or shadowing
documentation, etc.:
<![if !vml]>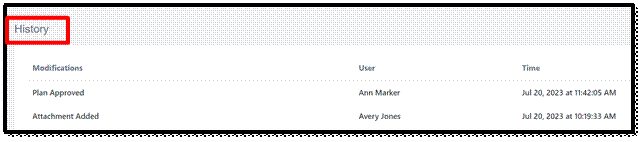 <![endif]>To see whether your manager approved
your latest plan update, scroll to the History
section to review when the plan was created,
modified, and last approved by your manager:
To add or change
plan objectives or the learning
actions within them, select Edit Development Plan
<![if !vml]> <![endif]>from the dropdown at the top of the plan and then follow
the steps in Section 4 of these instructions:
7. TECHNICAL ASSISTANCE OPTIONS���������������������������������������������������������������
OPTION A: Use the Contact Live Support option at the top of your CAPS LMS Welcome
Page:
<![if !vml]>
 |
<![endif]>
OPTION B: Email the main CAPS LMS mailbox:
capslms@childrenandyouth.ohio.gov.
OPTION C: Contact your RTC for assistance: https://ohiocaps.org/ocwtp/rtcs/.